top of page


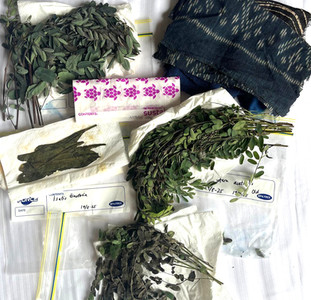
Edith Sandstöm (left) | Indigo samples submitted by Samorn Sanixay


Indigo Shade Map is excited to share an open call from Edith Sandström, who recently began a postdoctoral research project using stable isotope mass spectrometry to study the provenance of heritage dyes. Her work begins with indigo and madder, exploring how this method might reveal not only dye identification but also insights into provenance, trade relations, and cultural exchange.


To build this research, Edith is seeking geographically diverse, well-documented reference materials of indigo and madder. She invites the natural dye community to contribute small samples (~1 g) from any part of the process—plant material, extraction baths, or dyed objects.

Below is Edith’s full message with details on how you can contribute:


Full message from Edith Sandström:


Hello all,


My name is Edith Sandström and in May I began my postdoctoral research project

using stable isotope mass spectrometry to help determine provenance of heritage

objects, starting with indigo and madder (https://data.snf.ch/grants/grant/216127).

We want to explore if this technique let us go beyond dye identification and could

help our understanding of provenance, trade relations and cultural exchange. For

this, we need geographically diverse, well-documented indigo and madder reference

materials.


Therefore, I was wondering (and hoping!) that you in the dye community would be

willing to send around 1 g of any indigo and madder material you have/will collect

(any and all parts of the process, including plant material, extraction bath or dyed

objects) to help with the method development and building of the initial reference

map. It would be great if you could include the location of the garden, if fertilizers

have been used, the likely origin of the soil and potential fertilizers, as well as the

likely origin of any additives (e.g. lime) that have been added to the sample you

send.


I am more than happy to arrange an online meeting to explain my project further or

just explain more in an email to anyone interested. I will cover all shipping costs, and

I also have access to laboratory equipment, so I will be able to run some analyses in

return if wanted. Please contact me with any questions: edith.sandstroem@hefr.ch

Thank you to Rosa for letting me put out this open call and to all that is willing and

able to share their hard-earned material and knowledge. It is deeply appreciated!


All the best,

Edith


From Sludge to Shelf: Filtering , Muslin-Filtering, and Dehydrating Indigo Pigment


ree

This Blog has several pieces written by Amanda Gough, AFA and Indigo Shade Map Intern & Apprentice


Before you start: how to know the pigment is ready to filter

Distinct layers: A clear or tea-tinted liquid on top and a darker, inky sludge at the bottom.

Time settled: Typically a few days  after aeration process.


Step 1 : After the Aeration process Let the pigment settle completely

1. Place your extraction vessel somewhere it won’t be bumped.

2. Cover loosely to keep dust out.

3. Give it enough time to form a crisp boundary between clear liquid and pigment. If the line is cloudy, wait longer.


Tip: Cooler temperatures and stillness improve settling.


Step 2 :  Remove the clear liquid


Goal: Remove as much supernatant as possible without disturbing the pigment.


We used pitchers


Stop when the liquid begins to look milky/colored—this means you’re nearing the pigment layer.


Rosa Chang Korean Indigo Master displaying properly processed liquid being removed from the container. Image by Amanda Gough, AFA

Step 3 : Consolidate the pigment

1. If you have multiple containers, combine the sludge into one vessel.


Upcycled Muslin with Indigo Print after filtration process. Photo by Amanda Gough

Step 4 : Set up your muslin filter

1. Stretch 2–3 layers of muslin over a clean bowl/strainer or hoop.

2. Secure with clamps or rubber bands so the cloth won’t sag or collapse.

Apprentice Timothy Prieto Scraping the fabric to assign the filtration process. Photo by: Amanda Gough


Step 5 :  Filter the pigment through muslin

1. Pour the pigment sludge slowly into the center of the muslin.

2. Let gravity work until dripping slows.

3. Draw the muslin corners together to make a bag and gently twist/squeeze to press out more water.

4. If the cloth clogs, pause, scrape the surface with a spatula to expose clean weave, or transfer to fresh cloth.


Result: You’ll have a dense indigo paste inside the muslin and relatively clear filtrate in the bowl.


Step 6 :  Prepare dehydrator trays

1. Line trays with silicone dehydrator sheets or parchment so the paste won’t bond to the mesh.

l


Step 7 :  Spread the paste

1. Transfer paste from the muslin to the lined trays.

2. Use a spatula to spread it into thin, even sheets

3. Label the tray (batch/date/process notes).


Step 8 :  Dehydrate low and slow

1. Turn on the dehydrator

• Cooler settings preserve color and reduce “baked” binder smells if any organics remain.

2. Dry 6–12 hours, checking every couple of hours. Time varies with thickness and humidity.

3. Dryness test: The sheet should be crisp and snap cleanly; no cool or tacky spots.


No dehydrator? Air-dry on lined trays in a dust-free space 1–3 days. Avoid direct sun and drafts that might blow pigment away.


Indigo Master Rosa Chang and Apprentice- Intern Amanda Gough participating in the filtration process.  Instax by Timothy Prieto
Indigo Master Rosa Chang and Apprentice- Intern Amanda Gough participating in the filtration process. Instax by Timothy Prieto

Step 10 :  Break, grind, and store

1. Lift the sheet; it should peel from the liner.

2. Break into flakes. If desired, use a mortar/pestle to make a fine powder (wear a dust mask).

3. Store in airtight glass jars or mylar bags. Add a food-safe desiccant if humidity is high.

4. Label with: plant/species, date, method (fresh-leaf/lime %, washes), and any notes.


Image of the submerged indigo after 2 days of soaking  by Amanda "Ama Liza" Gough
Image of the submerged indigo after 2 days of soaking by Amanda "Ama Liza" Gough

This blog series includes three different pieces written by Amanda "Ama Liza" Gough, AFA and Indigo Shade Map Intern & Apprentice.


Preparing to remove the indigo leaves by: Amanda "Ama Liza" Gough

Blog 2 of 3

The Alchemy of Color: Soaking, Sliming & Stirring into Blue


In this second entry of our Indigo Apprenticeship series, we explore the aromatic and transformative next phase of fresh leaf extraction. After harvesting and sorting our indigo (Persicaria tinctoria), we shift into an alchemical process that spans several days, requiring patience, observation, and respect for timing and sensory cues.


Apprentice Susan Tuberville removing the leaves from the containers. photo by: Amanda "Ama Liza" Gough

Stage One: Soaking the Leaves in Water (Fermentation)


Once your fresh indigo leaves are harvested, cleaned you will submerge them completely in a large vessel of clean, room-temperature water. You will leave this in a secure container outside in the warmth. Check daily, observing changes in color and smell.


Over the course for a couple of days, you’ll notice the water darkening from greenish to a distinct turquoise-teal hue. This color presents almost neon. This color shift indicates the water-soluble precursor to indigo (indican) is beginning to break down.


Tips for Check Point #1


Visual Cue: The water turns turquoise.

Tactile Cue: Leaves feel slimy to the touch.

Olfactory Cue: The Smell of Putrid Death


Once indigo leaves are removed after the quick ferment. photo by: Amanda Gough

At this point, the fermentation has broken down the cell walls of the leaves, releasing the indigo precursors into the water. Remove the leaves. If left too long, the fermentation can “overcook,” degrading the indigotin and affecting yield. We suggest composting the putrid leaves.


Master Indigo Dyer Rosa Chang examined the container to confirm it was ready to go through the next process  by: Ama Liza
Master Indigo Dyer Rosa Chang examined the container to confirm it was ready to go through the next process by: Ama Liza

Stage Two: Letting the Pigment Settle (Reduction Preparation)


After removing the leaves, allow the remaining liquid to sit undisturbed for more days secured in the heat.


Tips for Checkpoint #2:

Visual Cue: A shimmering film forms on the surface of the liquid. This film indicates that the fermentation process has completed and the pigment is ready to be fixed with an alkaline material.


Olfactory Cue: The aroma thickens brace yourself


The blue film that resides once the solution is ready to go through the aeration process. Photo of  Stern Jenkins Volunteer-Apprentice by : Amanda Gough
The blue film that resides once the solution is ready to go through the aeration process. Photo of Stern Jenkins Volunteer-Apprentice by : Amanda Gough

Stage Three: Adding Alkaline (Calcium Hydroxide / Pickling Lime)


First add a little of the indigo solution to the bowl with the lime to help it dissolve. You should see it turn blue slightly before adding it into the bath.


Indigo Master Rosa Chang adding the calcium hydroxide (pickling lime) to the solution accompanied by Apprentices Amber and Mimi . Photo by Amanda Gough

Now, slowly stir in calcium hydroxide (pickling lime) to raise the pH and precipitate the pigment.


Add in small increments, stirring constantly, until the liquid reaches a right pH level.


This addition prepares the bath for oxidation, which transforms the reduced indigo into visible, insoluble blue pigment.


Apprentice Amanda Gough participating in the aeration process, everyone took a turn. Photo by : Amber Likins

Stage Four: Aeration (Oxidizing the Indigo)


Immediately after adding lime, begin aerating the vat vigorously stirring continuously. Wear clothes that you don't care get stained and stinky.


Rosa Changs hand after touch testing the turquoise bubbles during the aeration process. Photo by: Amanda Gough

Tips for Checkpoint #3:

Visual Cue:

• Bubbles appear as you agitate the vat. The should go from white bubble to  turquoise bubbles and then blue bubbles.

• Liquid shifts from teal to deep blue.

• Foamy blue bubbles begin to form and cluster at the surface.


Auditory Cue:

• A subtle carbonated “fizz” or crackling sound often accompanies the final phase of pigment oxidation this is a signal you’ve reached peak transformation. Stop agitating the solution now.


Successfully oxidized indigo colored bubbles. Photo by: Amanda "Ama Liza" Gough

Stage Five: Rest and Settle


After aeration, cover the container and allow it to sit undisturbed for more days to let the pigment particles settle at the bottom.


The color of liquid that is ready for the resting period. Photo by: Amanda Gough


Indigo_logo3.jpg

© Rosa Chang and Indigo Shade Map 2025 All Rights Reserved.

bottom of page